Entra ID configuration
Entra ID import has two configuration sections, basic and advanced.
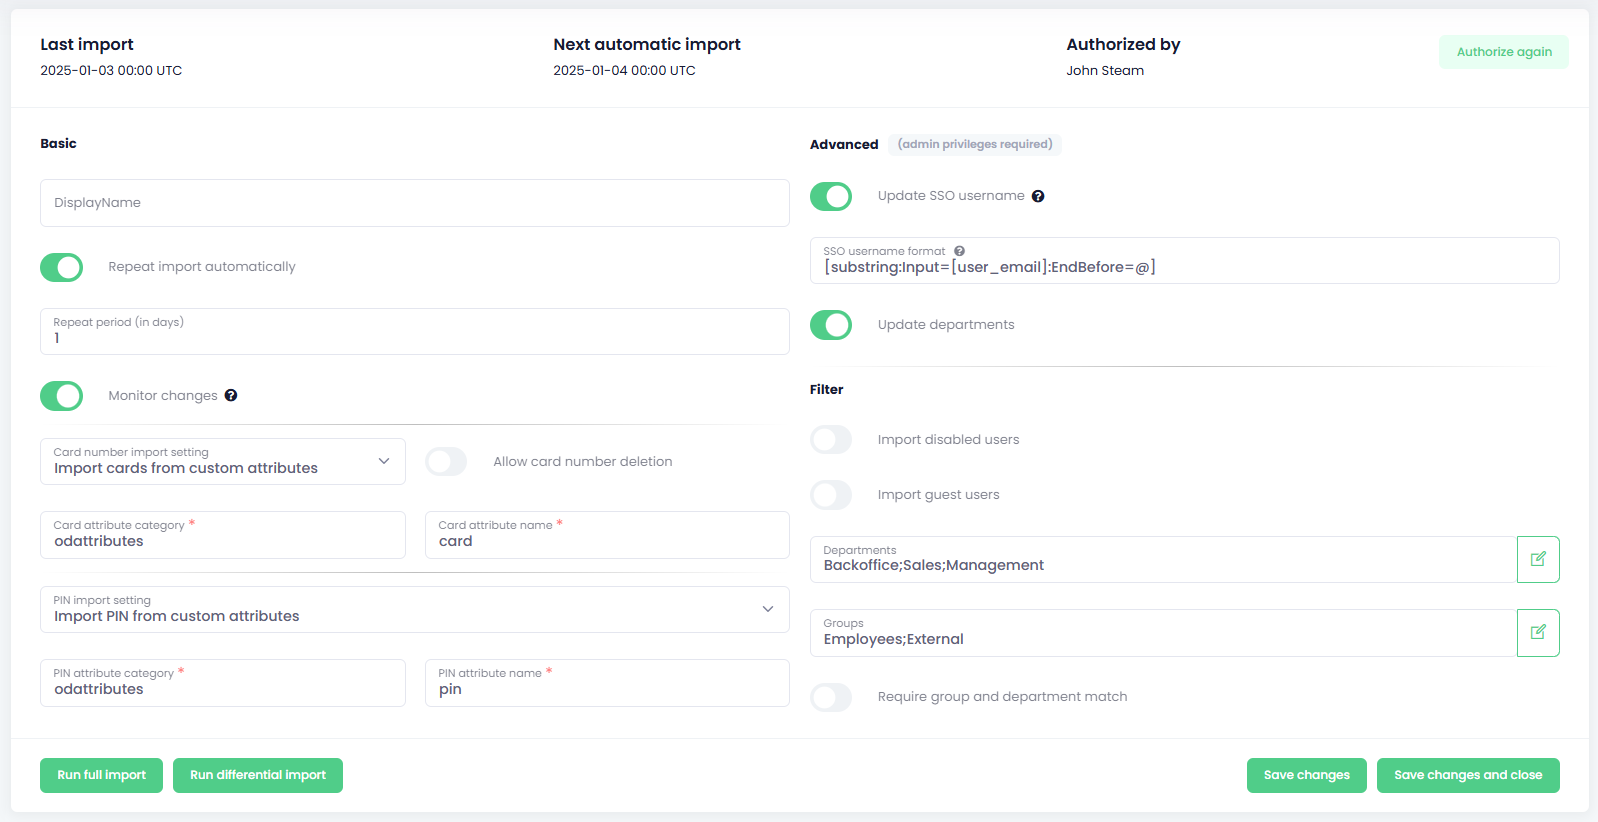
Basic configuration:
- Display name - the Display name changes name of source in Import sources list.
- Repeat import automatically - check this option to realize import automatically in a defined period.
- Repeat period (in days) - type the time period in days between synchronization
- Monitor changes - if enabled, changes are monitored using web hooks nearly real-time, https://learn.microsoft.com/en-us/graph/webhooks
- Card number import settings - select the option for card number import
- Don't modify card numbers - this option won't import therefore modify card numbers of users in the system
- Import cards from standard attributes - use standard Entra ID attribute names for card number import
- Import cards from custom attributes - use custom Entra ID attribute names for card number import
- Allow card number deletion - if this options is disabled, only new cards will be added, when enabled the cards will be removed and only the cards from import source will be added
- Card attribute category - use custom Entra ID attribute category name for card number import
- Card attribute name - use custom/standard Entra ID attribute name for card number import
- PIN import settings - select the option for PIN import
- Don't modify PIN -
- Generate PIN when empty - check this option to generate a PIN for every user during the import. In case the user already has a PIN that is not generated.
- PIN length - number of digits in the PIN
- Generate PIN for new users - when ticked, OptimiDoc Cloud will generate PIN for new users
- PIN length - number of digits in the PIN
- Import PIN from custom attributes - use standard Entra ID attribute names for PIN import
- Import PIN from standard attributes - use custom Entra ID attribute names for PIN import
- PIN attribute category - use custom Entra ID attribute category name for PIN import
- PIN attribute name - use custom/standard Entra ID attribute name for PIN import
|
|
🗲 |
IMPORTANT To create and edit attributes the “Attribute Definition Administrator” role is required. To edit user attributes the “Attribute Assignment Administrator” role is required. First you have to create attribute in company, in short, “Protection” > “Custom security attributes” (https://entra.microsoft.com/#view/Microsoft_AAD_IAM/CustomAttributesCatalogAttributeSetsBlade). Once created you can assign this attribute to the user. Card can be multi-value field. PIN can be just one, if there are more values, only the first one will be imported. |
Advanced configuration:
- Update SSO username - when the option is checked, the user’s SSO name is updated during every import
- SSO username format - when you leave the field blank then user email is used
- [user_sam_account_name]
- [user_principal_name]
- [user_email_nickname]
- [user_mail_nickname]
- [user_full_name], [user_name]
- [user_given_name], [user_first_name]
- [user_family_name], [user_last_name], [user_surname]
- [user_mail], [user_email]
|
|
🖹 |
EXAMPLE
|
- Update departments - when the option is checked, the user’s department is updated during every import
- Filter
- Import disabled users - if enabled, disabled users will be imported as well, otherwise only active users are synchronized
- Import guest users - if enabled, guest users will be imported as well
- Departments - if you will define departments only users from those departments will be synchronized
- Groups - if you will define groups only users from those groups will be synchronized
- Require group and department match - it switches between the OR and AND operation for the Departments and Groups fields, if enabled, user must be in both, department and group specified
|
|
🗲 |
IMPORTANT Advanced configuration options require Administrator privileges on Entra ID for the user who authorities import. |
Click on Save to keep the configuration for the next planned import, or click on Save & Run to start import immediately. During the first import, the administrator is asked to authorize access to Entra ID.
Authorization can be realized again by clicking on the Authorize again button.